Documentation
Features > Clean Up Local Admins.
Staying on top of your admin accounts is no easy feat.
This is particularly true for older, larger companies that have created admin accounts when onboarding new employees and have been unable to keep track of them over time.
The problem that results is an untracked number of rogue accounts that have elevated access, but may not be being used, monitored, or protected adequately. Every one of these rogue admin accounts doubles as a point of access for cyber criminals searching for elevated privileges to launch an attack, and the more these you have, the greater your attack surface, and the higher the risk of a security breach.
Leaving them be is a dangerous option, but even more so is eliminating them all and unintentionally rendering your endpoints unusable. With Admin By Request version 7.3, we’ve added a feature that makes the job of tidying up your loose ends (i.e., loose admin accounts) easy:
Clean Up Local Admins.
Feature Overview
The Clean Up Local Admins feature allows you to get rid of unwanted administrator accounts with the click of a button.
Admin By Request already provides a ‘birds-eye’ view of all your administrator accounts in a single place; that single place now includes a Revoke Rights button for each Admin account.
The idea is to eliminate the cumbersome task of locating these unused accounts and having to disable each of them from the endpoint they belong to. Instead, you can get the job done on multiple endpoints from a single place – your Admin By Request User Portal.
Using the Feature
- Navigate to the Inventory page, select an endpoint, and click the Local Admins item from the left-hand menu to get to the ‘birds-eye’ view of all of your administrator accounts on that endpoint (now illustrated as cards for each account):
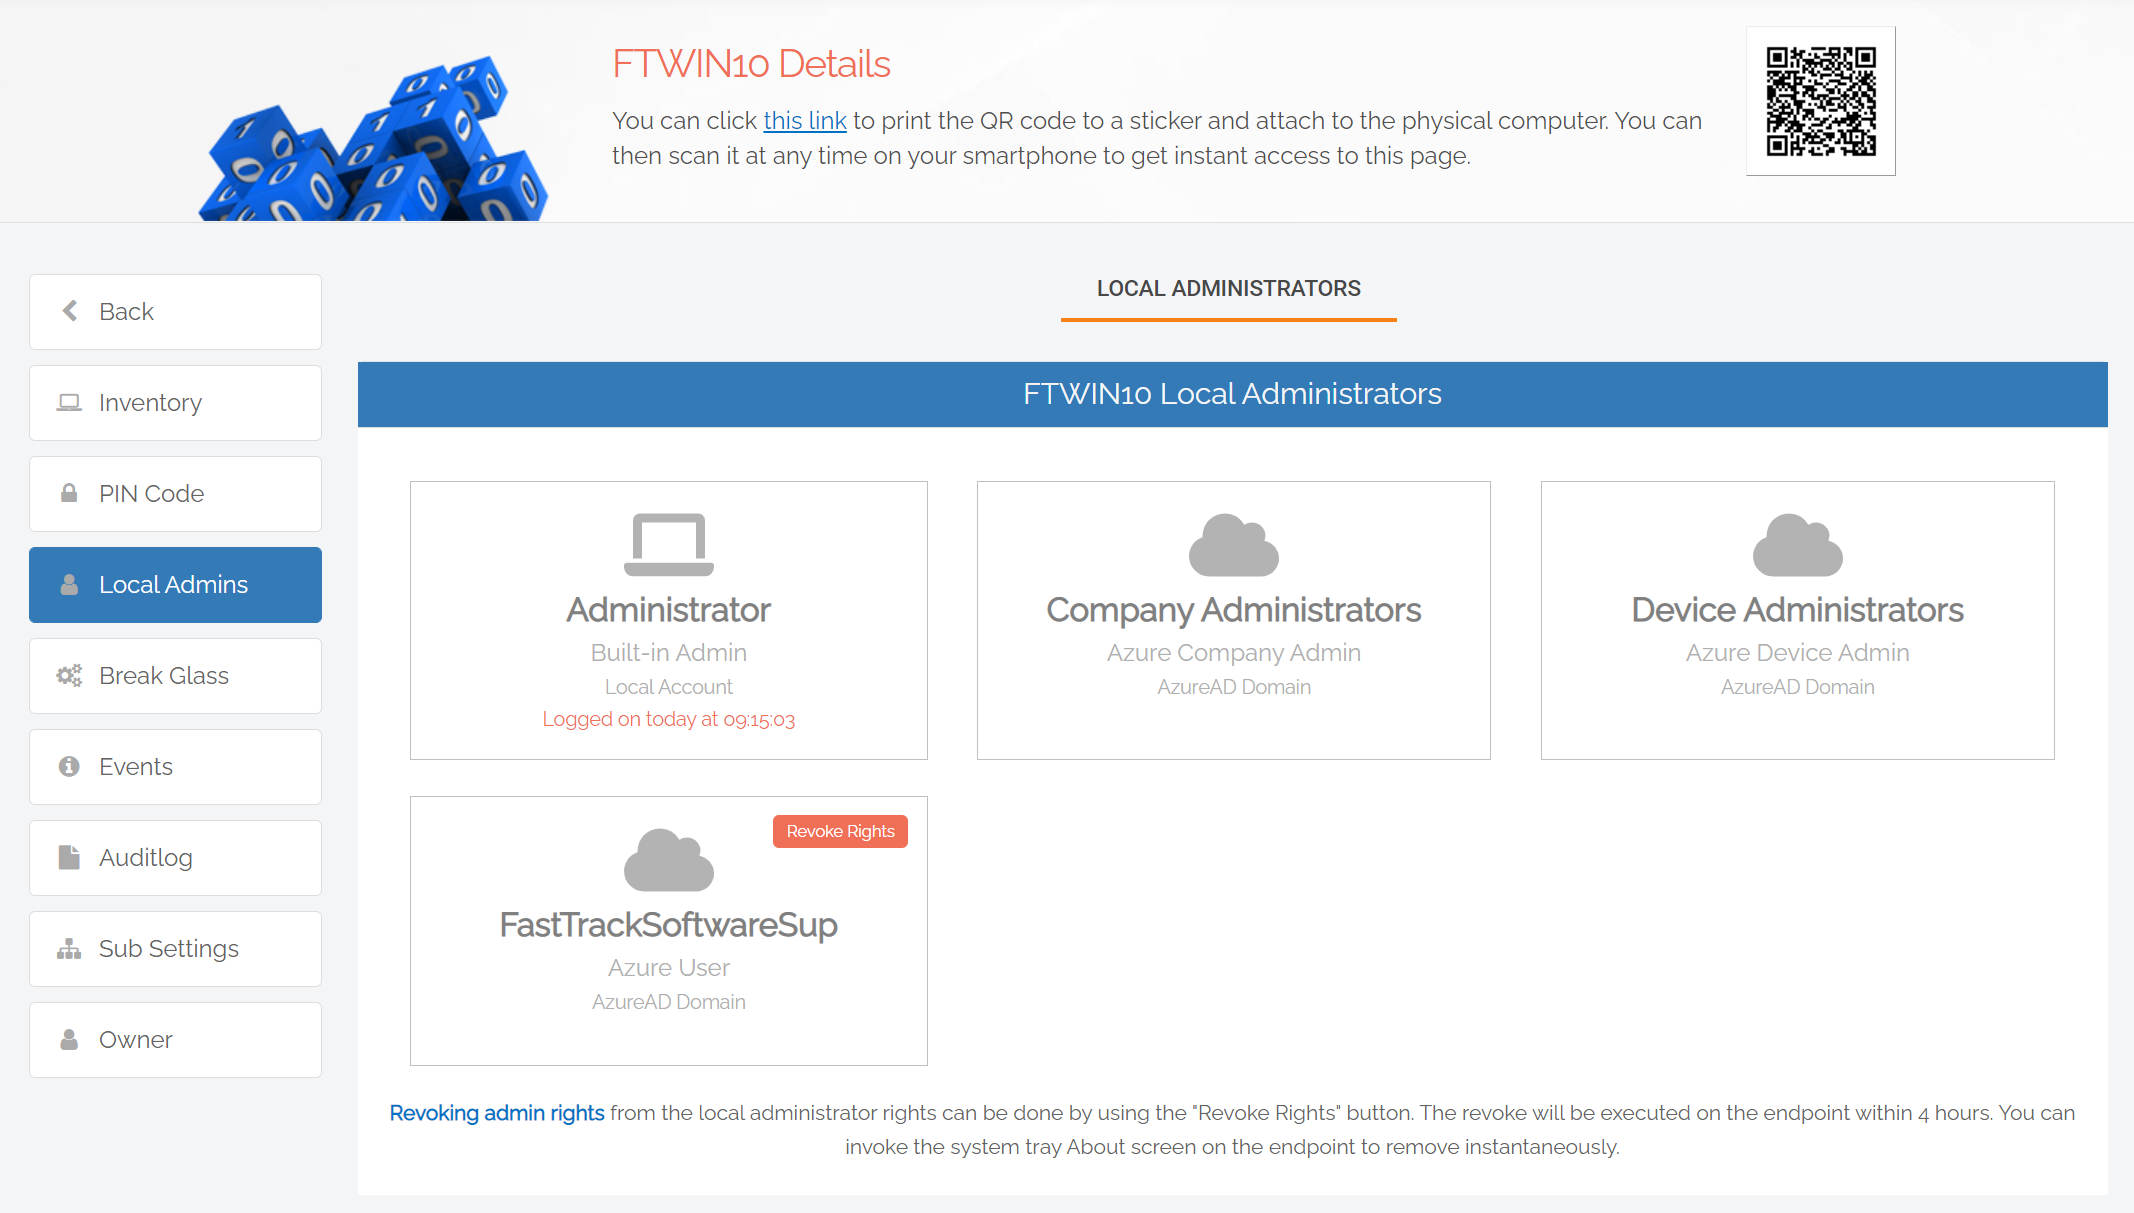
- Each account card indicates what type of admin account it is by it’s name and icon:
- AzureAD account – cloud icon
- Domain account – computer network icon
- Built-in Windows Administrator account – computer icon
- Local admin account – person with shield icon
- Etc.
- For every endpoint that has Admin By Request 7.3 installed (and is able to be removed – more on this further down), the Clean Up Local Admins feature is available, indicated by an orange Revoke Rights button in the top-right corner of the account card.
- Identify the accounts you want to ‘clean up’ based on their name and type (dead accounts may be indicated by long numbers in the place of a distinguishable name). Simply click the button for every admin account you want to remove.
- When selected, the button changes from Revoke Rights to Cancel Revoke, and orange fill, to orange outline. If you make a mistake in revoking, you can easily undo the action by selecting the button:
.png)
- Once an admin account is revoked, it is moved to a new section on the same page called Restore Revoked Local Administrators. It remains here for two weeks after revocation, during which time you can select the Restore Rights button in the top-right corner:

- As account-removals are issued, the details are listed in the Events section of the Local Admins page, including the time of the event, the action undertaken (i.e., ‘X account removed’), the account that the action was taken on, and the name of the user who instigated the action:
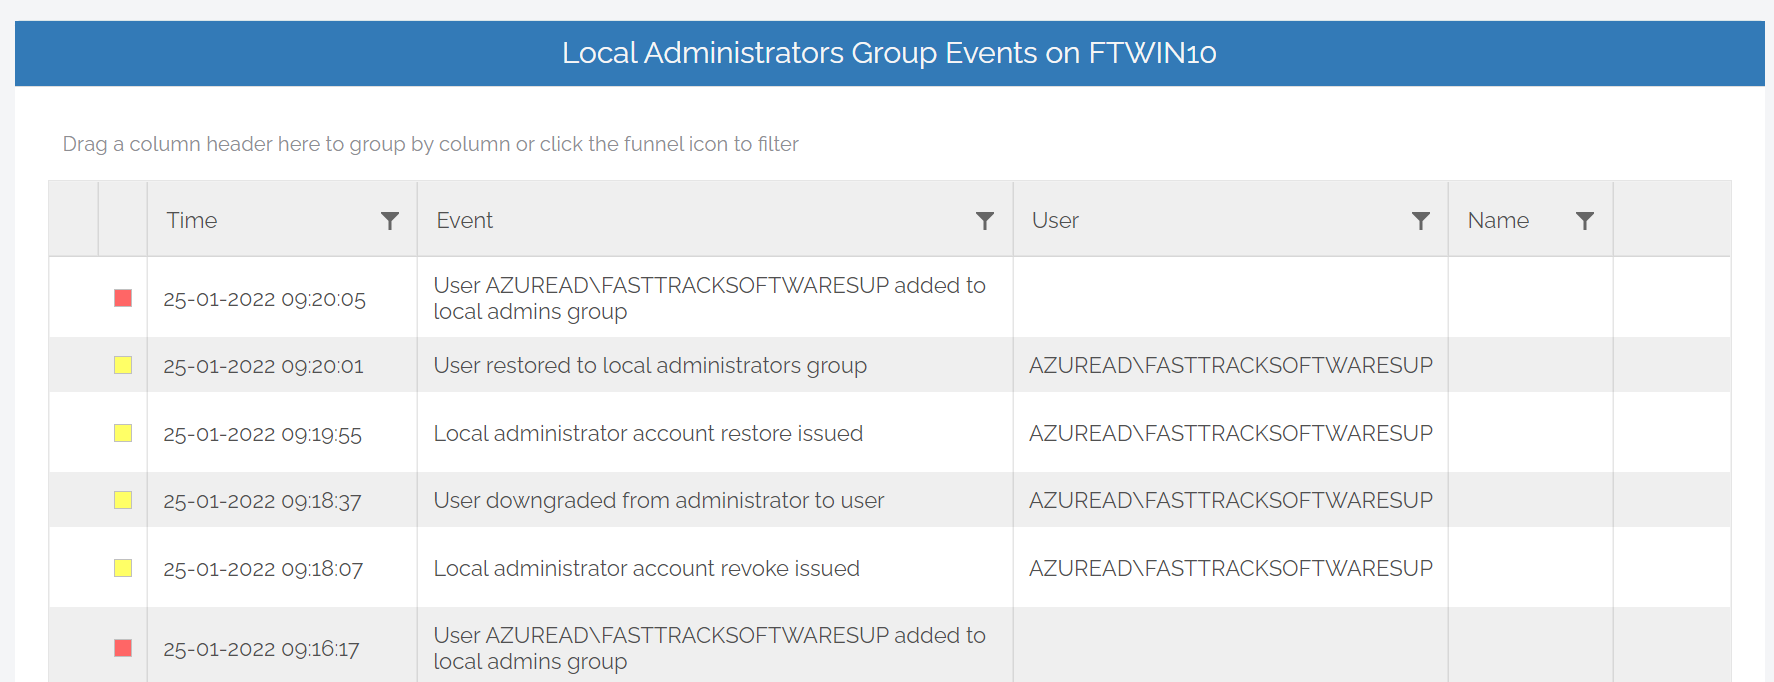
- After selecting Revoke Rights, the action is completed within four hours on the endpoint – an event which is also displayed in the Events table when it completes.
- There are safeguards built in to the feature to ensure you cannot remove certain accounts that would prevent you from logging in to your endpoints. These accounts include Active Directory\Domain Administrators, AzureAD\Device Administrators, AzureAD\Company Administrators, and the built-in Windows Administrator account.
Access via Reports Page
You can also use the Clean Up Local Admins feature via the Reports page, which includes functionality to reverse accidental removal of multiple accounts at a time.
Removing Accounts from Reports:
- Navigate to Reports > Endpoint Reports > Local Admins, and make sure you are in the Local Admins tab. Here, you get your administrator view in a list form, however, this list groups all admin accounts of the same type together, with the number of accounts listed in the Occurrences column:
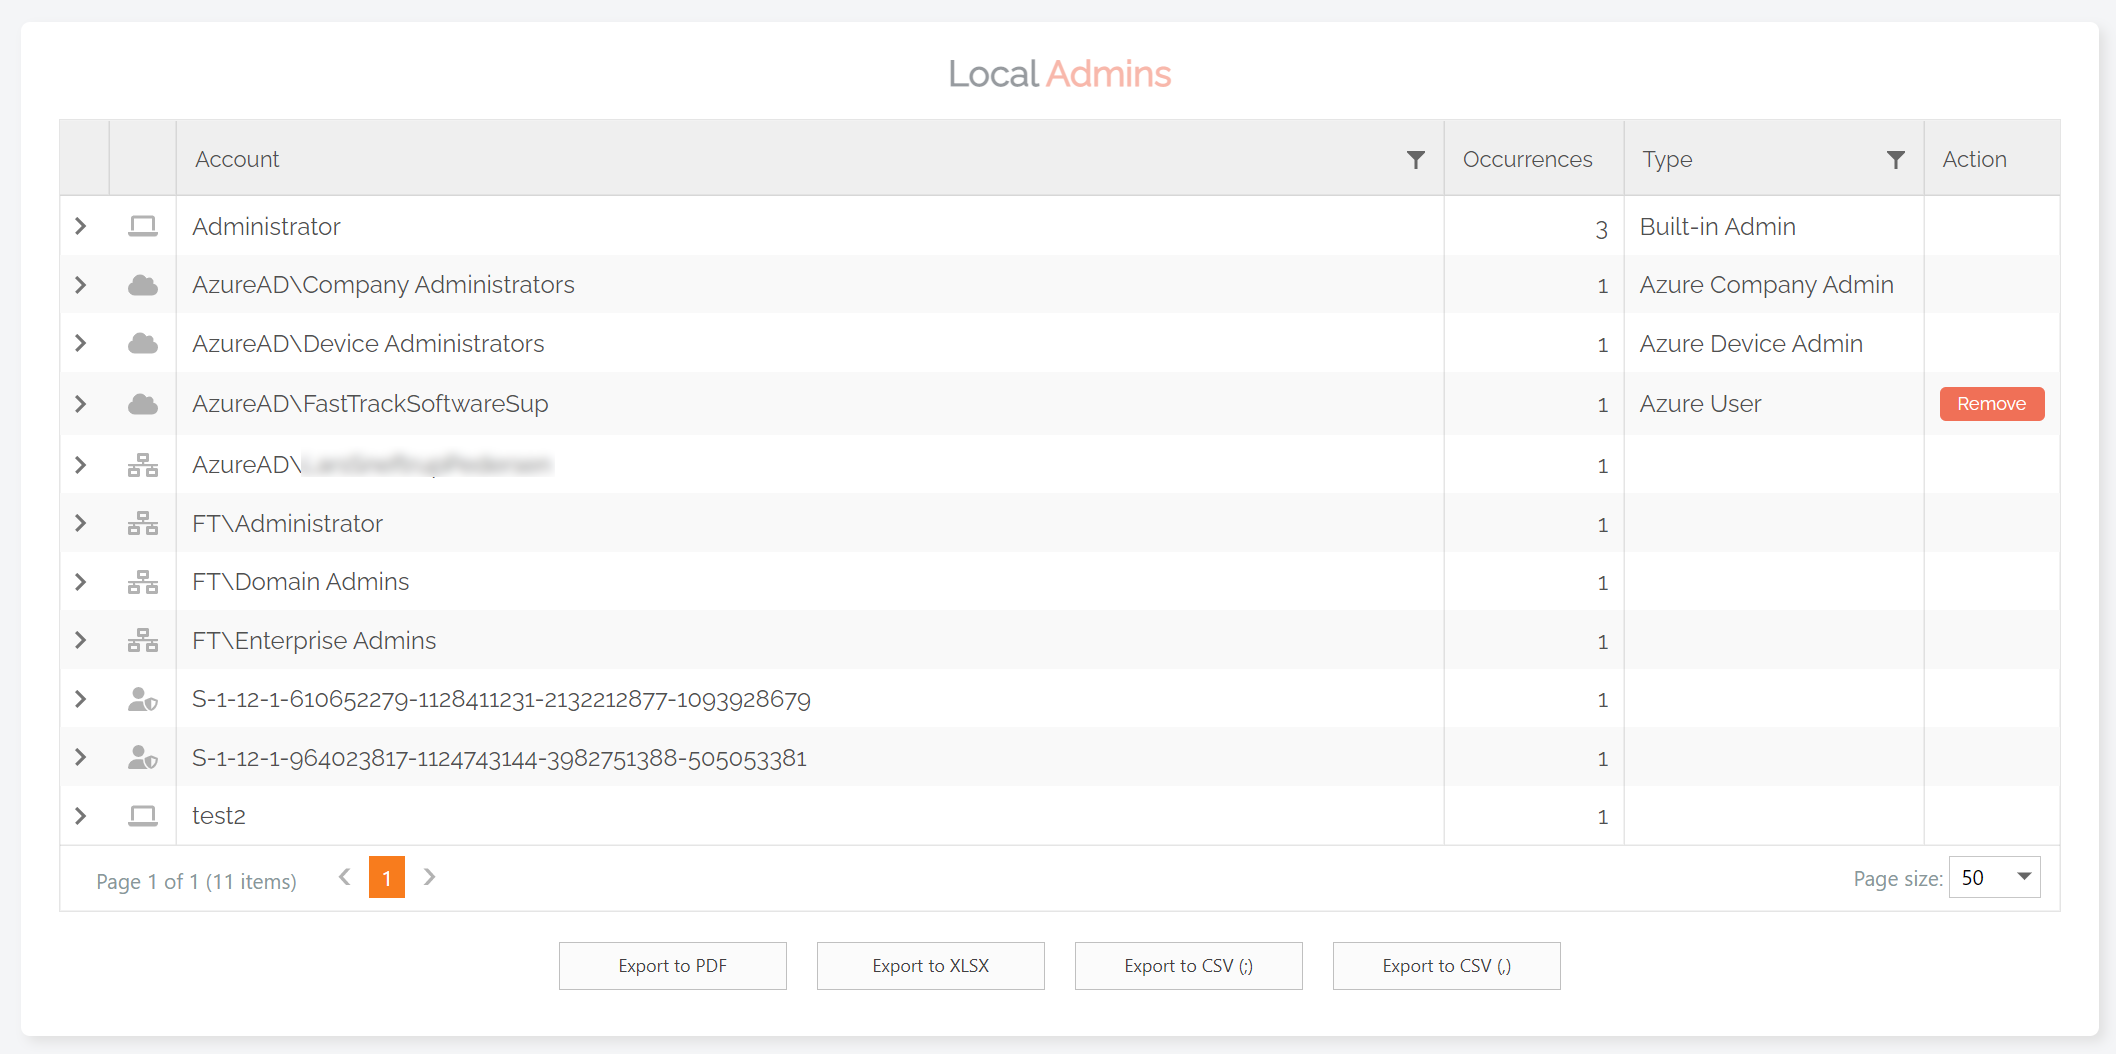
- As with the admin account cards shown in Inventory, these accounts are also classed by name and icon, and only those with version 7.3 installed have the Remove button available (in the right-hand column of the table).
- Locate rogue accounts and remove them by selecting the Remove button. Again, dead / rogue accounts are often indicated by a long number instead of a name (and there will often only be one of them – listed in the Occurrences column).
Undoing Remove:
Using the Remove feature from the Reports page provides the ability to remove large numbers of accounts in one go. For example, if you remove an account group which has 60 occurrences, all 60 will be removed at the single click of a button.
While very useful when used intentionally, it is possible to do this by mistake. Follow the steps below to reverse unintentional removal of local admin rights.
- On the Local Admins page (Reports > User Reports > Local Admins), locate and click the Restore Rights tab at the top of the page:

- Use the drop-down menu next to Show revokes since to view the appropriate groups:

- The list on the page displays removed groups of local admins. Locate the group that you want to reverse the Remove action on, and click the Undo button in the right-hand Action column.
- The group will have their local admin rights returned, and appear in the list under the Local Admins tab.
Summary
The Clean Up Local Admins feature new to version 7.3 is designed to make your environment tidier and more secure, and gives you the power to achieve this in a much more manageable way than what was previously possible.
Minimize your attack surface and get on top of your local admin accounts with the latest version of Admin By Request.
Stay Up To Date
Latest Blogs
Sicarii: The Vibe-Coded Ransomware That Broke Itself
Sicarii ransomware can't decrypt files even when victims pay the ransom. The code has fundamental flaws that make data recovery impossible.
How Often Should Privileged Access Reviews Be Conducted?
Privilege creep happens when admin access goes unchecked. This guide covers review frequencies from quarterly to continuous monitoring.
ShinyHunters Targets 100+ Organizations Through Okta SSO Vishing Campaign
ShinyHunters breached 100 organizations through voice phishing attacks targeting SSO credentials. The group has already leaked millions of user records online.

